Your aim feels wrong. I get it. You try to look at an enemy, but your crosshair moves too slowly. Then, suddenly, it flies across the screen. You feel like you are driving a boat, not playing a shooter.
The problem isn't your thumb. The problem is the default settings. Overwatch 2 hides the most important options behind confusing names. If you don't fix Overwatch 2 Aim Smoothing and Dual-Zone, you will always be at a disadvantage against players who have optimized their controls.
Let’s break this down simply so you can fix your aim in the next five minutes.
1. What Is Overwatch 2 Aim Smoothing?
Overwatch 2 Aim Smoothing is a setting that adds a delay to your aim.
Think of it like the suspension on a car. If you drive over a bump, the suspension "smooths" it out so you don't feel the hard hit. Aim Smoothing does the same thing for your thumb. If your thumb shakes a little bit, the game ignores those tiny jitters to make your view look smooth.
Why is this bad for you?
While it looks nice, it feels terrible to play. It creates "input lag." When you move your stick, the game waits a tiny fraction of a second to "smooth" the motion. This makes your aim feel floaty and slow.
The Quick Fix
- For fast reaction time: Turn Aim Smoothing down to 0%.
- For steady tracking: Keep it between 90-100% (only if you have very shaky hands).
Most players play better instantly when they drop this number to zero. Check out our guide on Reducing Input Lag on Console for more tips on making your game feel snappy.
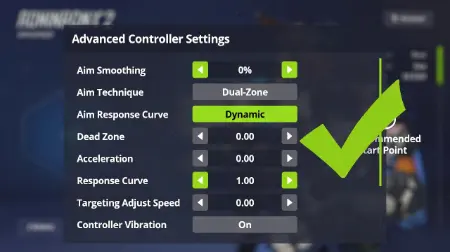
2. Aim Smoothing & Dual-Zone: How They Work Together
You can't talk about smoothing without talking about the "Aim Technique." This is how the game reads your thumbstick movement. The default is Dual-Zone, and it tricks a lot of players.
Dual-Zone Settings Explained
Dual-Zone splits your thumbstick into two circles:
- The Inner Circle (Center): Your sensitivity is very slow here. This helps you make small adjustments.
- The Outer Circle (Edge): Once you push the stick past 90%, the speed jumps to max speed instantly.
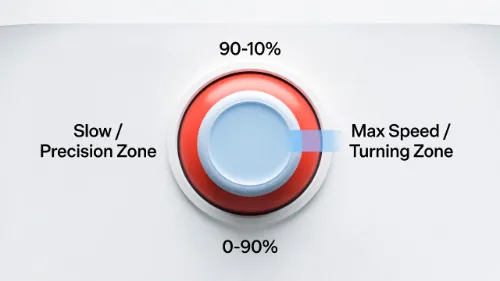
The Problem: There is no middle ground. You are either moving very slow or very fast. If you combine Dual-Zone with high Aim Smoothing, your character will feel like they are turning through mud.
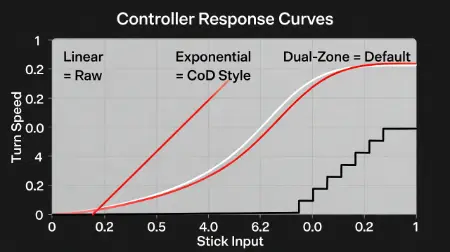
Linear Ramp vs. Exponential Ramp
If you hate how Dual-Zone feels, try these options found in the Official Overwatch 2 Patch Notes:
- Linear Ramp: What you put in is what you get. Push the stick 50%, and you turn at 50% speed. This is raw and fast but requires good thumb control.
- Exponential Ramp: This starts slow and speeds up gradually. This is the best setting for Call of Duty or Apex Legends players. If you came from those games, switch to Exponential Ramp immediately.
3. Best Overwatch 2 Aim Smoothing & Dual-Zone Settings for Each Role
One setting does not work for every hero. A sniper needs stability, but a ninja needs speed. Here are the presets you should try.
The Hitscan Profile (Soldier: 76, Cassidy, Ashe)
These heroes need to track moving targets accurately. We keep a little smoothing here to help with stability.
| Setting | Value | Why? |
|---|---|---|
| Aim Technique | Dual-Zone | Helps with fine adjustments at long range. |
| Aim Smoothing | 0% - 10% | Removes input lag but keeps it snappy. |
| Aim Assist Window | 30% | Keeps your aim assist "sticky" only on the enemy. |
The Speed Profile (Genji, Tracer, Lucio)
These heroes need to turn instantly. You cannot afford any delay.
| Setting | Value | Why? |
|---|---|---|
| Aim Technique | Linear Ramp | Raw input for muscle memory. |
| Aim Smoothing | 0% | You need instant reactions. |
| Aim Ease In | 20-30% | Adds a tiny curve so Linear doesn't feel too twitchy. |
The Console Standard (Beginner Friendly)
If you just want one setup that works for everyone, use this.
| Setting | Value |
|---|---|
| Aim Technique | Dual-Zone |
| Aim Smoothing | 95% |
| Horiz/Vert Sens | 45 / 45 |
| Aim Assist Strength | 100% |
4. Fixing Common Issues With Overwatch 2 Aim Smoothing
If you changed your settings and it still feels weird, check these hidden traps.
Why Is My Aim Drifting?
If your crosshair moves on its own, you have "stick drift." This happens when you lower your Deadzones too much.
The Fix: Increase your Aim Ease In or Deadzone Inner. This tells the game to ignore the stick unless you push it harder. See our detailed guide on Fixing Stick Drift and Deadzones.
Why Can’t I Turn Around Fast Enough?
You are likely fighting high Aim Smoothing.
The Fix: Lower your Smoothing to 0. If it is already 0, increase your Horizontal Sensitivity.
5. Frequently Asked Questions
Should I turn Aim Smoothing on or off in Overwatch 2?
Most players should turn it off or lower it significantly. Setting Aim Smoothing to 0 makes your aim feel instant and responsive. Only keep it high if your thumbs shake or you prefer a slower, smoother camera movement.
Is Dual-Zone better than Linear Ramp?
Dual-Zone is better for beginners and hitscan heroes because it makes small adjustments easy. Linear Ramp is better for advanced players who want to build consistent muscle memory without the game changing their speed automatically.
What is the best aim assist window size?
A smaller window size (around 20-40%) is usually better. A large window (100%) means your aim will slow down even if you are not looking directly at the enemy, which can mess up your tracking.