You hit the power button, the blue light pulses, but your TV screen stays black. No signal. It is the most common fault on the PlayStation 5. But here is the thing: replacing the port does not always fix the problem. Sometimes, the issue is deeper in the system, like the Panasonic encoder chip. If you just swap the port without checking, you might waste hours on a repair that was never going to work.
This PS5 HDMI Port Repair guide is different. We focus on diagnosis first. We will show you how to use a multimeter to check diode readings and confirm exactly what is broken before you pick up a soldering iron.
Before you start:
This guide requires a multimeter. If you are not comfortable using one, please read our safety guidelines first.
Phase 1: PS5 HDMI Port Repair Diagnostics (Start Here)
Before you tear down the console, look closely at the port. Grab a flashlight and look inside the HDMI port on the back of the PS5.
- Bent Pins: Do the pins look smashed or pushed back?
- Loose Port: Does the cable wiggle too much?
If the port looks physically mangled, you likely need a replacement. But if the port looks perfect and you still have no signal, you need to dig deeper.
The "No-Open" Test (Using a Breakout Board)
You can test the port without opening the PS5. You will need an "HDMI Breakout Board." This cheap tool plugs into the port and lets you test pins from the outside, adhering to standard HDMI pinout specifications.
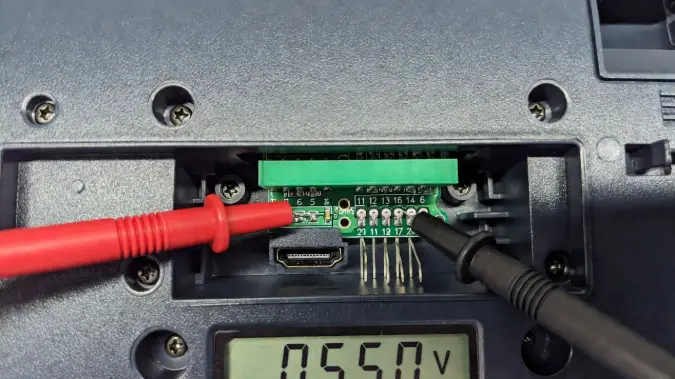
- Set your multimeter to Diode Mode.
- Put the Red Probe on the metal casing (Ground).
- Put the Black Probe on each numbered pin on the breakout board.
If you get a reading of OL (Open Line) on a data line (Pins 1-12), your port is likely disconnected internally. If you get 0.000, you have a short circuit.
Phase 2: PS5 HDMI Port Repair Diode Readings
If you have opened the console and removed the motherboard, you can get accurate readings. This is the only way to know if the problem is the port or the HDMI Encoder IC (the chip that controls the video).
How to Measure Diode Readings
To get correct readings, you must place your multimeter probes correctly on the motherboard.
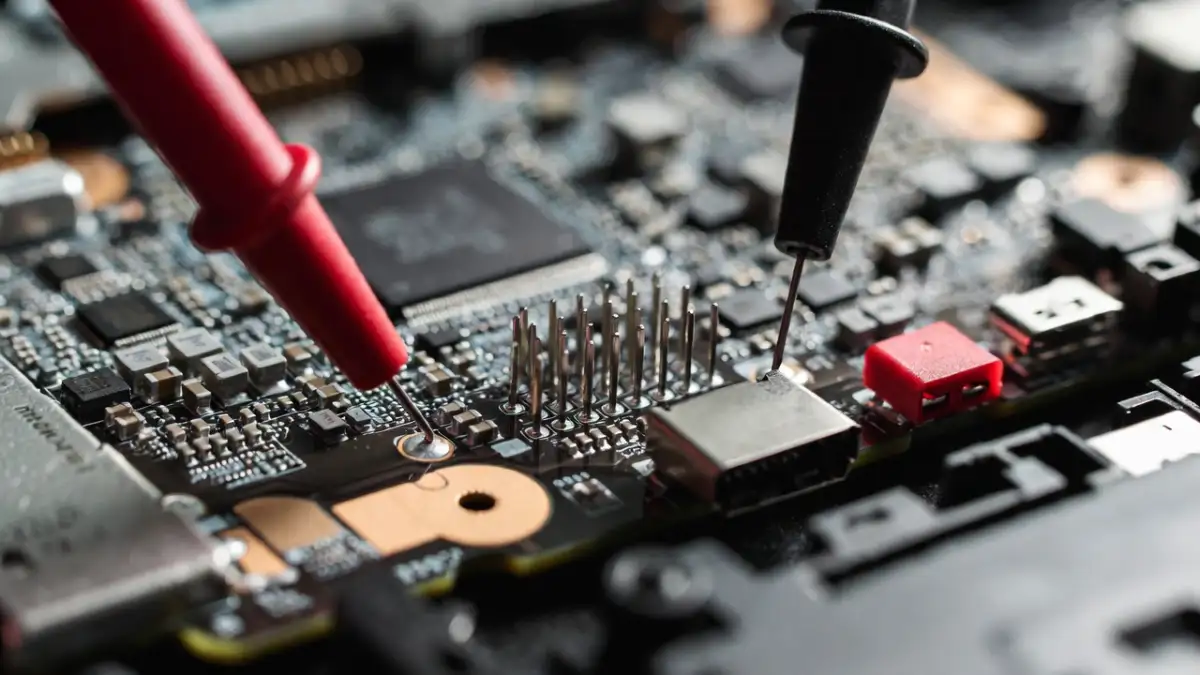
Here are the reference values you should see on a healthy PS5 motherboard. Note that values can vary slightly (± 10%) depending on your multimeter brand.
| Pin Number | Function | Healthy Reading (Approx.) | Bad Reading |
|---|---|---|---|
| Pin 1-12 | Data Lines | 0.400 - 0.700 | OL (Open) or 0.000 (Short) |
| Pin 13 | CEC | 0.400 - 0.700 | 0.000 |
| Pin 14 | Utility | OL (Usually Unused) | 0.000 |
| Pin 15 | SCL | 0.400 - 0.700 | 0.000 |
| Pin 16 | SDA | 0.400 - 0.700 | 0.000 |
| Pin 17 | Ground | 0.000 (Beep) | N/A |
| Pin 18 | +5V Power | 0.500 - 0.700 | 0.000 (Short to Ground) |
| Pin 19 | HPD | 0.500 - 0.700 | 0.000 |
Is it the Port or the Encoder Chip?
This is where many people mess up their PS5 HDMI Port Repair.
- If Pin 18 (+5V) reads 0.000 (Short): The capacitor on that line might be bad, or the port pins are touching inside.
- If all Data Pins (1-12) read OL: The port legs are broken off the pads.
- If readings are erratic: Check the MN864739 Encoder IC. If the capacitors around that chip are shorted, replacing the HDMI port won't fix anything.
Phase 3: Step-by-Step Replacement Guide
Tools You Will Need
- Hot Air Station (approx 450°C)
- Soldering Iron with fine tip
- Good Quality Flux
- Low Melt Solder (Crucial for easy removal)
- Desoldering Wick
- New PS5 HDMI Port (Version 2.1)
Step 1: Remove the Old Port
Don't just blast it with heat. Sony uses high-temp factory solder. Apply flux to the anchor legs and add Low Melt Solder. Mix it with the factory solder to lower the melting temperature. Heat from the bottom of the board to protect nearby plastic. When solder flows, gently lift the port.
Step 2: Clean and Install
Use your iron and wick to clean the pads until they are flat and shiny. Clean with Isopropyl Alcohol. Place the new port, solder the anchor legs first, then solder the 19 small pins.
Pro Tip: If you bridge two pins, add more flux and drag your iron across them to separate the solder.
Phase 4: Post-Repair Verification
Stop! Do not reassemble the PS5 yet. You need to verify your work. Go back to Phase 2 and check the diode readings again. Do you have 0.400 to 0.700 on the data lines? Good. Do you have 0.000 on Pin 18? Bad. Fix the bridge before powering on.
Frequently Asked Questions (FAQ)
How do I know if my PS5 HDMI port is broken?
Look for bent pins inside the port or a loose connection. If the port looks fine, use a multimeter to check for open lines (OL) or shorts. A white light on the console that turns to blue but shows no image is a classic sign.
Can I fix a PS5 HDMI port without soldering?
No. The port is soldered directly to the motherboard. You cannot glue or tape it. You need a hot air station and soldering iron to do the repair correctly.
What is the cost of a PS5 HDMI port repair?
If you do it yourself, the port costs about $10-$15. If you take it to a repair shop, it usually costs between $100 and $150 because of the labor and skill involved.