You lose a match. Not because you played badly, but because your character turned the wrong way. You flicked the stick left. You let go. But suddenly, your character is facing right.
This is not "drift." This is Switch Pro Controller snapback. It is one of the most annoying issues for competitive gamers, especially in titles like Super Smash Bros. Ultimate.
1. What Is Switch Pro Controller Snapback?
Many people confuse "snapback" with "drift," but they are opposite problems.
- Drift: Your character moves even when you are not touching the stick.
- Snapback: Your character moves in the opposite direction after you flick the stick and let go.
Think of it like a saloon door. If you shove it open and walk through, it doesn't just close gently. It swings back and forth a few times before stopping. That "swing back" is what causes the wrong input.
2. How to Test for Switch Pro Controller Snapback
You need a tool to visualize the data.
The Visual Test:
- Open the Gamepad Tester tool on your PC or Mobile.
- Look at the circle that represents your joystick.
- The Flick: Push your stick all the way to the left (or any direction) and release it instantly. Let it snap back to the center on its own.
- The Result: Watch the dot closely.
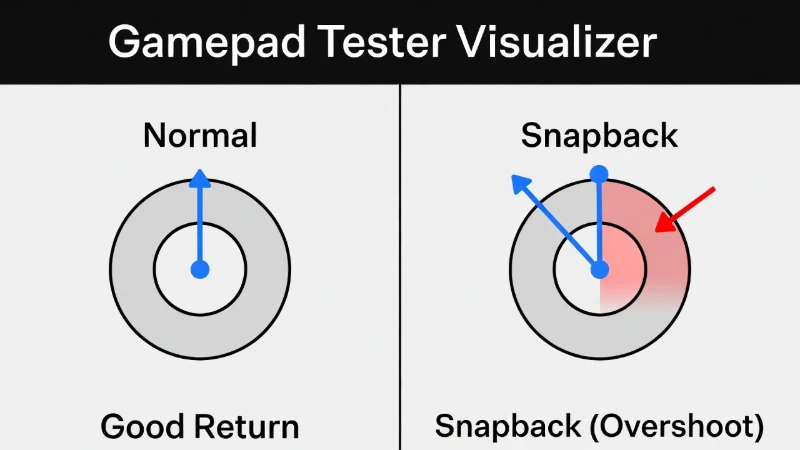
Left: A healthy controller returns to center. Right: Snapback causes the signal to "overshoot" into the opposite zone.
Check Your Controller Now
If you see that dot cross the line into the red zone on the tester, your controller has snapback.
Launch Tester Tool3. How to Fix Switch Pro Controller Snapback
If you have confirmed the issue, you have three main options.
Option A: The Break-In Method
The Fix: Use the controller heavily for 20 to 30 hours. As you play, the parts loosen up. This friction acts like a natural brake, slowing down the stick before it hits the center.
Option B: The Grease Method
What you need: High-viscosity damping grease (like Nyogel 767A).
How it works: The thick grease creates resistance. It stops the stick from moving so fast that it overshoots the center.
Option C: The Capacitor Mod (Permanent Fix)
This is the solution pros use. To fix snapback perfectly without making the stick feel heavy, you need to solder a small component called a capacitor to the controller's circuit board.
Which Capacitor Value Should You Use?
| Capacitor Value | Effect Strength | Recommended For |
|---|---|---|
| 0.22µF | Light | Mild snapback. Minimal input delay. |
| 0.47µF | Medium | The Standard Choice. Fixes most issues. |
| 1.0µF | Strong | Severe snapback only. May feel slightly laggy. |
Step-by-Step Instructions
- Open the controller (you will need a JIS screwdriver).
- Locate the joystick sensor (potentiometer) legs on the motherboard.
- Solder the capacitor across the outer two legs of the sensor for the direction that is snapping back.
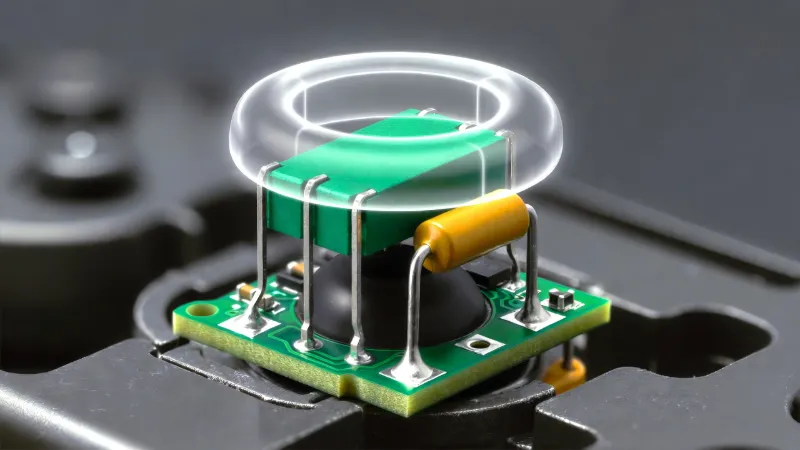
Solder the capacitor to the two outer legs of the sensor. Do not touch the middle leg.
4. Test it again on the Gamepad Tester before closing the shell.
4. Frequently Asked Questions
Q: Will the capacitor mod add input lag?
A: Technically, yes, but it is extremely small (milliseconds). For 99% of players, the lag is unnoticeable.
Q: Can I fix Switch Pro Controller snapback in the system settings?
A: No. The Switch calibration tool only fixes the "center point" (drift). It cannot fix the momentum or physics of the stick snapping back.
Q: Does snapback affect all games?
A: It happens in all games, but you only notice it in titles that require precise inputs, like Smash Bros, Splatoon, or fighting games.