If you play on a Nintendo Switch, you probably know the frustration of Joy-Con drift. You are trying to win a race in Mario Kart, but your car keeps turning left into a wall. Most people think the controller is broken forever. However, there is a famous DIY solution: the Joy-Con drift cardboard shim method.
Before you spend $80 on a new pair, let's see if we can fix the ones you have.
What Is the Cardboard Shim Method?
The cardboard shim method involves placing a tiny piece of paper or cardstock inside your controller.
The Science: Why the Shim Fixes Drift
Drift usually happens because the analog stick sensor metal shield inside the housing gets loose over time. The metal plate actually bows outward.
What this really means is that the sensors lose contact with the internal sliders. By adding a 1mm cardboard spacer, you create pressure. This pressure pushes the parts back together. This restores the connection and often stops the drift immediately.
Note:
This is different from calibrating your deadzones, which fixes software issues. This is a physical hardware repair.
Check Software Calibration FirstWhy This Fix Is Different
- Cost: Almost $0 (you just need a cereal box or a business card).
- Difficulty: Medium (you have to open the controller).
- Success Rate: Very high for standard wear-and-tear drift.
How to Install the Joy-Con Drift Cardboard Shim
To perform this fix, you need to be careful but confident. Follow these steps to ensure you do not damage the internal cables.
Tools Needed
| Tool | Purpose |
|---|---|
| Y00 Tri-wing Screwdriver | To open the outer case screws. |
| PH000 Phillips Screwdriver | To remove internal screws. |
| Cardstock (1mm thick) | The "shim" that fixes the drift. |
| Tweezers | To move small parts. |
You can find these specific screwdrivers in most standard tech repair kits like those from iFixit.
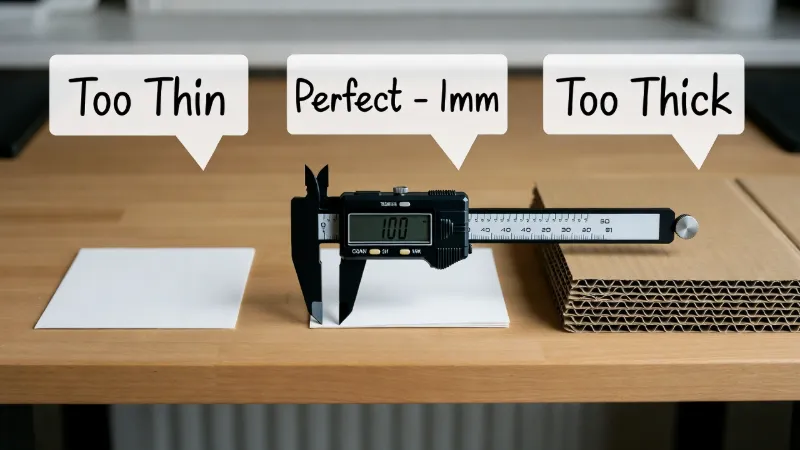
Selecting the Right Material
You cannot use just any paper. Standard printer paper is too thin, and box cardboard is too thick.
Step-by-Step Instructions
Step 1: Open the Shell
Remove the four screws on the back of the Joy-Con using your Y00 driver. Be gentle; these screws strip easily.
Step 2: Lift the Battery
Gently move the battery to the side. Do not pull the wires. You will see a metal compartment underneath.
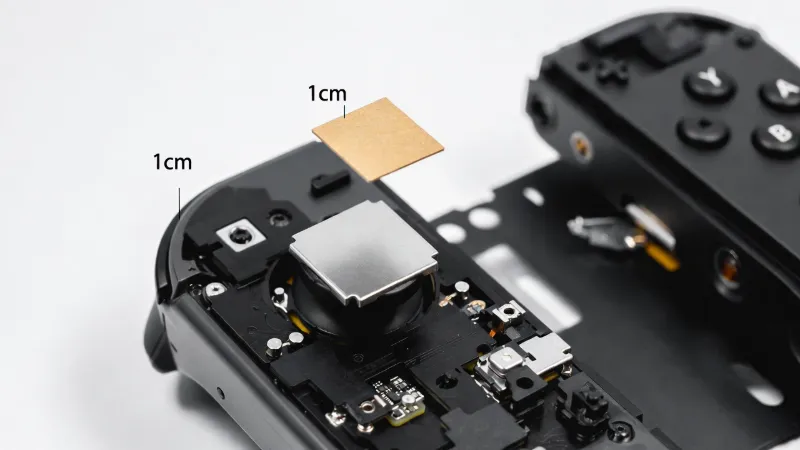
Step 3: Cut the Shim
Cut a piece of cardboard exactly 1cm x 1cm. It should be about 1mm thick (like the business card shown above).
Step 4: Place the Cardboard
Lay the cardboard piece directly on the metal square at the back of the joystick mechanism.
Step 5: Close It Up
Put the battery back. Screw the shell shut. The tight fit provides the pressure needed to fix the Joy-Con housing gap.
Step 6: Recalibrate
Once reassembled, turn on your Switch. Go to System Settings > Controllers and Sensors > Calibrate Control Sticks. Follow the prompts to ensure the new center point is set.
Is the Joy-Con Drift Cardboard Shim Method Permanent?
Many users wonder if this is a "forever" fix.
In our experience, this method lasts much longer than using canned air or contact cleaner. While "permanent" is a big word, many gamers report that their controllers have worked perfectly for over a year after adding the shim. However, if the cardboard compresses or gets damp, you might need to replace the piece of paper eventually.
Common Risks with the Cardboard Shim
Before you start, you should know the risks. Opening your controller will likely void your warranty with Nintendo.
- Stripped Screws: Switch screws are very soft. If you use the wrong screwdriver size, you might get stuck.
- Ribbon Cables: There are tiny "ribbon" wires inside. If you snap one, the buttons will stop working.
- Thickness: If your cardboard is too thick, the buttons might feel "mushy" or hard to press.
FAQ: Your Questions on the Cardboard Shim Fix
Does this fix work for the Switch Lite?
Yes, but the Switch Lite is harder to open. The controllers are attached to the screen, so you must be extra careful not to damage the device.
Will the cardboard catch fire?
No. The battery and components inside a Joy-Con do not get hot enough to set paper on fire. It is safe to leave inside.
What if the shim doesn't work?
If the Joy-Con drift cardboard shim doesn't help, your joystick might be physically broken or suffering from graphite contact wear. In that case, you may need to buy a replacement joystick part.