Let’s be real—nothing ruins a game faster than stick drift. You try to run straight, but your character walks off a cliff. It is frustrating. If you’ve already tried System Calibration or blowing air into the stick and it failed, you have a hardware problem. The internal parts are worn out.
The good news? You can fix this yourself. You don't need an engineering degree. You just need the right tools, about an hour of free time, and this guide. We will walk you through the entire Nintendo Switch Lite teardown safely.
1. Why Do Switch Lite Joysticks Drift?
Most Switch Lite consoles come with "potentiometer" joysticks. These use small wipers that rub against a track to track movement. Over time, friction wears down the pads, dust gets inside, and the Switch registers movement even when you aren't touching the stick.
The Permanent Fix: Hall Effect Joysticks
You have a choice before buying parts:
- Standard Replacement: Cheap ($5-10), but they will eventually drift again.
- Hall Effect Upgrade: Slightly more expensive, but they use magnets instead of physical contact. They do not touch, so they do not wear out.
Our Recommendation: If you want to fix this once and never worry about it again, buy Hall Effect joysticks.
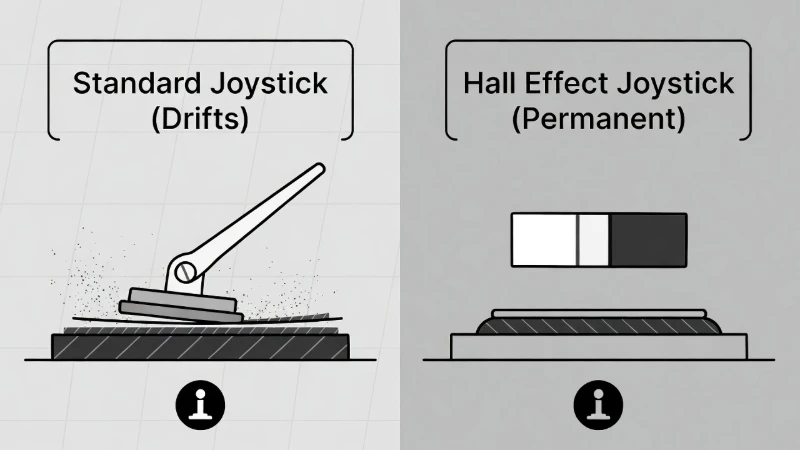
Why Upgrade? Standard sticks rely on friction and wear out. Hall Effect sticks use magnets and last virtually forever.
2. Tools You Need (Don't Strip Your Screws!)
Do not use a random screwdriver from your kitchen drawer. Nintendo uses specific screws. If you force a standard Phillips driver into them, you will create a "Switch Lite Y00 screw stripped" nightmare.
| Tool Name | Why You Need It | Critical Note |
|---|---|---|
| Y00 Tri-Wing | Opens the outer shell. | Must be high quality. |
| PH00 Screwdriver | Removes internal screws. | Use JIS (Japanese Standard) if possible. |
| Plastic Spudger | Unplugs battery/cables. | Never use metal tools to pry! |
| Tweezers | Handles ribbon cables. | Plastic-tipped is safest. |
| Thermal Paste | Replaces old paste. | Required for Right Stick only. |
3. Phase 1: Opening the Console
We must open the device before accessing the joysticks. Take your time here.
- Remove Back Screws: Locate the four Y00 screws on the back corners. Also remove the smaller screws on the top and bottom edges. Keep them organized!
- Pop the Backplate: Use your plastic tool to gently pry the back case off. Start near the speakers. It will pop off with a snap.
- Remove Metal Shield: Unscrew the silver PH00 screws holding the large metal plate down.
Safety Stop
Disconnect the Battery First! Follow the colored wires from the battery to the motherboard. Use your plastic spudger to lift the white connector straight up. If you don't unplug this, you could short out your screen backlight.
4. Phase 2: Switch Lite Left Joystick (The "Easy" One)
The Left Stick (near the D-pad) sits on a separate circuit board called a daughterboard. This is the easier side to fix.
The Hidden Danger: The ZIF Connector
The ribbon cable is held in a "ZIF connector" by a tiny locking flap. This is where most beginners break their Switch.

CRITICAL: Lift the grey locking flap UP before pulling the cable.
- Remove Daughterboard: Unscrew the board. It connects via a ribbon cable.
- Unlock the Flap: Flip the small flap UP with your fingernail. Do not pull the cable until the flap is up.
- Swap the Stick: Unscrew the old joystick box (2 screws). Insert the new Hall Effect stick.
- Reconnect: Slide the cable back in until it hits the white line. Flip the latch DOWN to lock it.
5. Phase 3: Switch Lite Right Joystick (The "Hard" One)
The Right Stick (near ABXY buttons) is under the main motherboard. You must disassemble more components to reach it.
- Remove Game Card Reader: Unplug its ribbon cable and unscrew it.
- Remove Heat Pipe: Gently wiggle the copper tube free. It will be sticky from old paste.
- Lift Motherboard: You do not need to fully remove it. Unscrew the board and gently lift it just enough to reach the joystick screws underneath.
- Swap and Paste: Replace the joystick. Before reassembly, wipe off the old gray paste and apply a small dot of new thermal paste to the processor.
6. Reassembly & Mandatory Calibration
Put everything back in reverse order. Remember: Finger tight only on the screws. The plastic shell cracks easily.
Your New Stick Will Drift (At First)
Don't panic. This is normal for new parts.
- Turn on the Switch Lite.
- Go to System Settings > Controllers and Sensors > Calibrate Control Sticks.
- Follow the prompts to teach the Switch the new "center" point.
- Restart the console to save the changes.
Frequently Asked Questions
Can I fix drift without taking the Switch apart?
Sometimes. Try "System Calibration" in settings first. You can also try blowing compressed air under the rubber skirt. If those fail, the part is physically worn and must be replaced.
Is the Left or Right replacement harder?
The Right Joystick is significantly harder. It requires removing the thermal system and motherboard. The Left Joystick is on a separate board and is easier for beginners.
Will this void my warranty?
Likely yes. If your console is less than a year old, contact Nintendo Support first—they might fix it for free.