If your Nintendo Switch controllers slide off the screen while you play, you likely have a broken Joy-Con buckle lock. This tiny plastic piece holds your controller onto the console. Over time, that plastic wears down and loses its grip.
Here’s the thing: you don't need to buy a whole new set of controllers. Upgrading your Joy-Con buckle lock is a cheap, permanent fix. Let's break down how to do it and decide if the metal upgrade is right for you.
Why the Joy-Con Buckle Lock Fails
Nintendo made the original Joy-Con buckle lock out of plastic for a specific reason. It acts as a "sacrificial part." If you drop your Switch, the plastic lock breaks so the metal rail on your expensive tablet doesn't get bent or damaged.
However, the plastic often wears away just from normal use. When that happens, the Joy-Con buckle lock can no longer hold the weight of the controller. Replacing it with a metal version means the lock will likely never wear out again.
Joy-Con Buckle Lock Comparison: Metal vs. Plastic
This choice comes down to durability versus console safety.
| Feature | Plastic Joy-Con Buckle Lock | Metal Joy-Con Buckle Lock |
|---|---|---|
| Durability | Low (Wears out over time) | High (Lasts forever) |
| Safety | Breaks to protect console | Won't break; might stress rail |
| Price | Very cheap | Affordable |
| Install Difficulty | Medium | Medium |
Tools Needed for a Joy-Con Buckle Lock Upgrade
Before you start, make sure you have the right tools. Using the wrong screwdriver will strip the screws. If that happens, you cannot finish the repair. You can usually find these in a standard electronics repair kit or check a site like iFixit for tool standards.
- Y00 Tri-wing Screwdriver: Required for the outer case screws.
- PH00 Phillips Head Screwdriver: Required for the internal screws.
- Tweezers: Needed to handle the tiny Joy-Con buckle lock and its spring.
- Pry Tool: Used to gently open the plastic shell.
How to Install Your New Joy-Con Buckle Lock
Installing a new Joy-Con buckle lock takes about 15 minutes per side. Follow these steps closely.
Step 1: Open the Case
Remove the four Y-screws on the back. Gently pry the shell open like a book. Be careful—thin ribbon cables connect the two halves.
Step 2: Move the Battery
Lift the battery out. It is held by light glue. This lets you reach the screws underneath the battery tray.
Step 3: Find the Latch
Look for the silver bracket near the release button. This houses the Joy-Con buckle lock. Unscrew the bracket and lift it up.
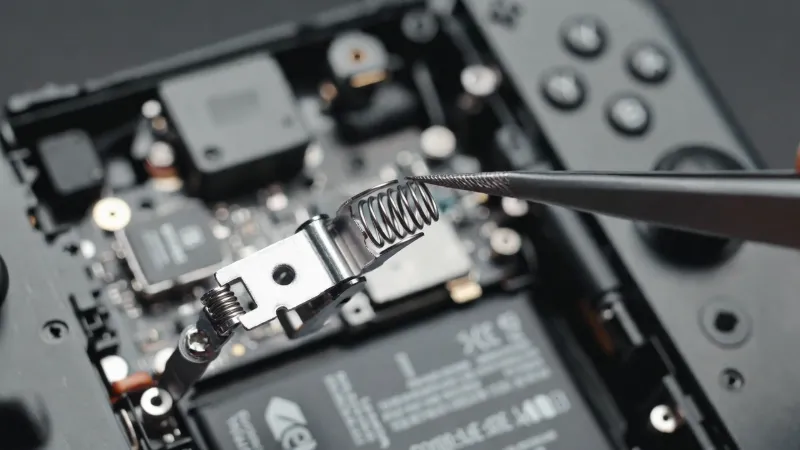
Step 4: The Spring Trick
Use your finger or a piece of tape to hold the tiny spring down while you swap the old Joy-Con buckle lock for the metal one. If that spring shoots across the room, it is very hard to find!
Step 5: Reassemble
Put the bracket back in place. Replace the battery tray. Screw the shell shut.
Testing Your Joy-Con Buckle Lock Repair
Watch the Cables!
Before closing the shell, ensure the ribbon cables shown below are not caught between the plastic frames. This causes button failure.
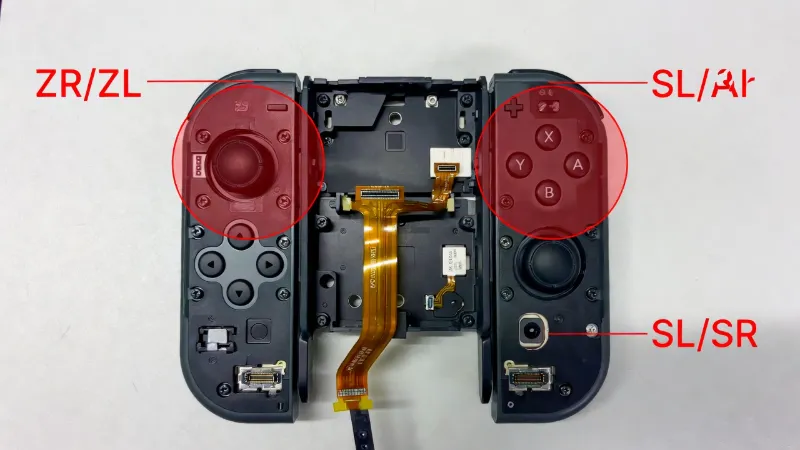
Once you finish, don't jump straight into a game. Use our online Gamepad Tester to check your buttons. Sometimes, a ribbon cable gets pinched during the replacement. If your "ZR" button or "SR/SL" buttons do not respond on the tester, you will need to reopen the case and reseat the cables.
FAQ: Joy-Con Buckle Lock Upgrades
Will a metal Joy-Con buckle lock damage my Switch?
It shouldn't damage it during normal play. However, if you drop the console, a metal lock won't break. This means the force of the fall goes into the console rail instead of the latch.
How do I know if my Joy-Con buckle lock is broken?
If you can slide your controller off the Switch without pressing the round release button on the back, your lock is worn out.
Is it hard to replace the Joy-Con buckle lock?
It is a "Level 2" repair. It isn't hard, but the parts are very small. If you can use tweezers and a screwdriver, you can do it.