You are here because your controller is acting up. Maybe your camera pans left when you aren't touching the stick. This is called stick drift. Or maybe your aim feels heavy and slow. If you bought the game directly on Steam, fixing this is easy. But for non-Steam games—titles from Epic Games, GOG, or emulators—it is harder. If you don't set it up right, the settings won't apply.
This Steam Input guide will help you fix drift, adjust sensitivity, and ensure Steam recognizes your game.
Internal Check: Check your current drift levels with our Gamepad Tester Tool before starting.
Why Configuring Deadzones for Non-Steam Games is Different
Most guides assume you are playing a native Steam game. When you add a non-Steam game to your library, Steam creates a shortcut. If you don't set this up correctly, Steam Input cannot "hook" into the game.
This means you can move the deadzone sliders, but the game will ignore them. We must ensure Steam is talking to your game first.
Step 1: Adding the Game for Your Steam Input Guide Configuration
You cannot configure deadzones if Steam doesn't see the game running.
- Open Steam.
- Click Games in the top menu.
- Select Add a Non-Steam Game to My Library.
- Find your game executable (
.exe) in the list.

Critical Tip:
If you play games from the Epic Games Store (like Fortnite or Rocket League), adding the game file directly often fails. Instead, add the Epic Games Launcher as your non-Steam game. Launch the launcher through Steam. This forces the Steam Input overlay onto any game you start from there.
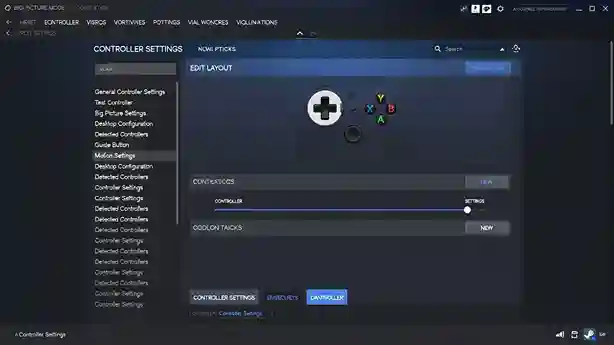
Step 2: Accessing the Menu for Configuring Deadzones in Steam
Valve changed the user interface recently. Old guides show a menu that doesn't exist anymore. Here is how to find the right menu now:
- Right-click your newly added game in the Steam Library.
- Go to Manage > Controller Layout.
- Click the Edit Layout button.
- Select Joysticks from the side menu.
You are now in the command center for configuring deadzones.
Step 3: Fixing Stick Drift (Inner Deadzone)
Stick drift happens when your controller sensors wear out. They send a signal to move even when the stick is centered. We fix this by creating a "dead" area in the center where Steam ignores input.
How to set it:
- Look for the Deadzone Type dropdown. Set it to Custom.
- Find the slider for Deadzone Inner.
- Start at 5% (roughly 2000-3000 value).
- Test it in-game. If the camera still moves on its own, bump it up to 8% or 10%.

Rule of Thumb: Keep this number low. If you set it too high (like 20%), your aim will feel jerky. You will have to push the stick too far before the game responds.
Step 4: Configuring Deadzones for Responsiveness (Outer Deadzone)
The Inner Deadzone fixes drift. The Outer Deadzone changes how fast you move.
- What it does: It defines how far you push the stick to hit "maximum speed."
- The Fix: If the game feels slow, lower the Outer Deadzone. Try 90%. This lets you hit max running speed without hitting the plastic edge of the controller.
Deadzone Shape Comparison Table
Part of configuring deadzones is choosing the right shape.
| Deadzone Shape | Best For... | Why? |
|---|---|---|
| Circle | FPS Games (COD, Halo) | Consistent aim speed in all directions. |
| Square | Rocket League, Fighting | Lets you hit perfect diagonals (corners) faster. |
| Cross | Retro / 2D Platformers | Locks movement to strict Up/Down/Left/Right axes. |
Advanced Settings: Using Anti-Deadzone
Here is a setting most guides miss. Sometimes a game has a built-in deadzone that makes controls feel bad. You often cannot turn this off in the game options.
You can use Steam's Anti-Deadzone buffer to cancel this out.
- How it works: It tells the game you are pushing the stick slightly, even when you aren't. This removes the game's built-in delay.
- Warning: If you set this too high, you will cause drift. Use small adjustments.
Troubleshooting Your Configuration
If you followed the steps but the game still feels wrong, check these common issues.
1. The "Admin" Problem
If your game runs as "Administrator," Steam cannot overlay its settings unless Steam is also running as Administrator.
- Fix: Close Steam completely. Right-click the Steam icon on your desktop. Choose Run as Administrator. Launch your game again.
2. The Overlay Check
Press Shift + Tab while in the game.
- If the Steam overlay appears: Your settings are active.
- If nothing happens: Steam is not hooked. Go back to Step 1. Try adding the Launcher instead of the game file.
Frequently Asked Questions (FAQ)
Why is my controller configuration not working for non-Steam games?
Usually, the Steam Overlay isn't loading. Ensure you launch the game through Steam. Also, try running Steam as an Administrator.
What is the best deadzone setting for FPS games?
A low Inner Deadzone (3% - 5%) and a Circle shape is best. This gives you high accuracy for aiming.
Does Steam Input add input lag?
Technically yes, but it is less than 1 millisecond. Most gamers cannot feel it. The benefit of fixing drift is worth it.
Can I use these settings for Epic Games or Ubisoft Connect titles?
Yes. You must add the game (or its launcher) to Steam as a "Non-Steam Game" first. Once added, all Steam Input tools work correctly.