You press the trigger, but your gun fires a split second late. You slide, but your character reacts too slowly. In fast games like Call of Duty or Apex Legends, that tiny delay makes you lose fights you should have won. This delay often happens because standard Xbox controllers are "polled" (checked by your PC) only 125 times per second. That is slow compared to a gaming mouse.
Moving from 125Hz to 1000Hz reduces theoretical delay by over 80%.
Here is the good news: you can speed this up. This guide covers Xbox overclocking: reducing input lag with hidusbf. We will take your controller from 125Hz to 1000Hz. This makes your aim feel snappy and responsive.
1. What Does Xbox Overclocking Actually Do?
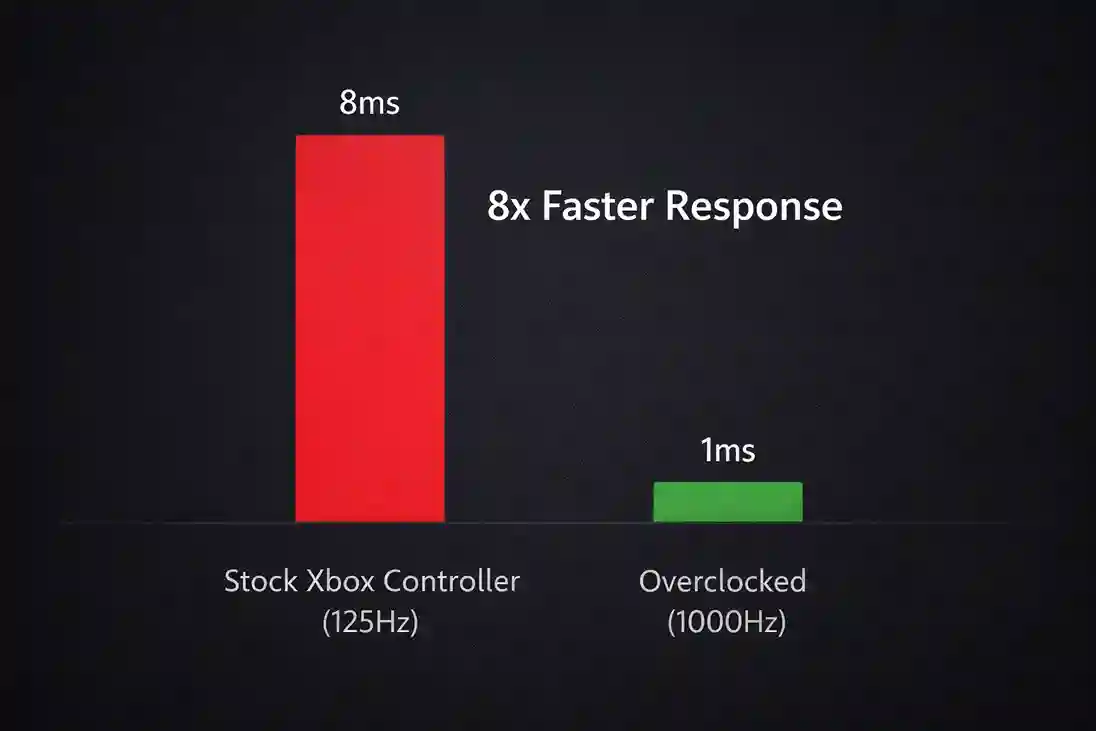
Standard Xbox controllers run at 125Hz. This means the controller sends data to your PC every 8 milliseconds. In gaming, 8ms is a long time.
We use a tool called hidusbf. It forces the USB port to check the controller more often. We can push this up to 1000 times per second. This drops the delay from 8ms down to 1ms.
- Stock (125Hz): 8ms delay. Feels "floaty."
- Overclocked (1000Hz): 1ms delay. Feels instant.
This does not make you a pro player overnight. But it removes the hardware limit holding you back.
2. Prerequisites for Overclocking
You need the right gear and settings before we start. This only works if you follow these rules:
- Wired Connection Only: Plug your controller in via USB-C or Micro-USB. This hack does not work for Bluetooth or the Xbox Wireless Adapter.
- Administrator Rights: You need permission to install drivers on your PC.
- The Software: You need the LordOfMice hidusbf driver files.
Warning for Windows 11 Users:
Windows 11 has strict security called "Core Isolation" or "Memory Integrity." This feature often blocks the overclock. We will show you how to handle this below.
3. Step-by-Step Xbox Overclocking Guide
Follow these steps exactly. If you skip one, the controller might not connect.
Step 1: Disable Driver Signature Enforcement
Most videos skip this part. Windows blocks "unsigned" drivers by default. We must turn this off temporarily to install the overclock.
- Hold the Shift key on your keyboard and click Restart in the Start Menu.
- Your PC will boot into a blue menu. Select Troubleshoot > Advanced Options.
- Click Startup Settings and then hit Restart.
- When the PC boots back up, press 7 or F7 on your keyboard to "Disable driver signature enforcement."
Your PC will look normal. But now it will let us install the driver.
Step 2: Install the Driver
- Download the hidusbf.zip file.
- Extract the folder to your desktop.
- Go into the folder labeled DRIVER and run the file named
Setup.exe.
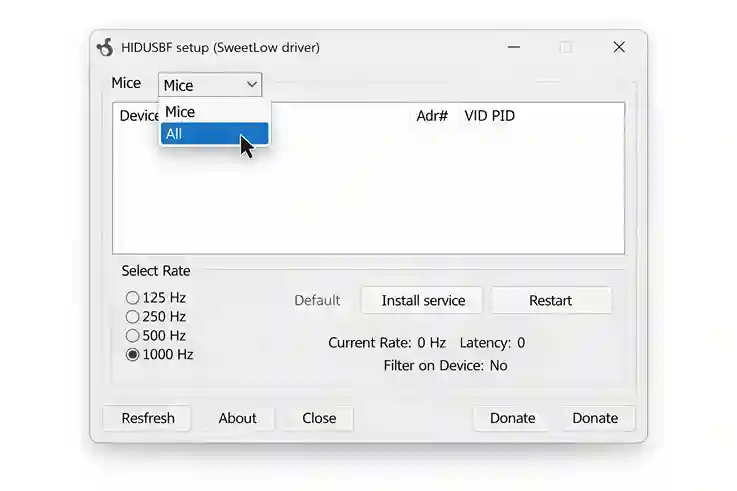 Make sure to switch the view from "Mice" to "All" to find your controller.
Step 3: Configure the Overclock Settings
This is where most people get stuck. If your window looks empty, look at the top left corner.
- Plug in your Xbox controller.
- In the drop-down menu at the top left, select All.
- Find your controller in the list. It usually says "Xbox Controller" or "Composite Device."
- Click on the row for your controller to highlight it.
- Check the box that says Filter On Device.
- Set Default to 1000.
- Click Install Service.
Unplug your controller and plug it back in. Look at the "bInterval" column. If it says 1, you did it. Your delay is now 1ms.
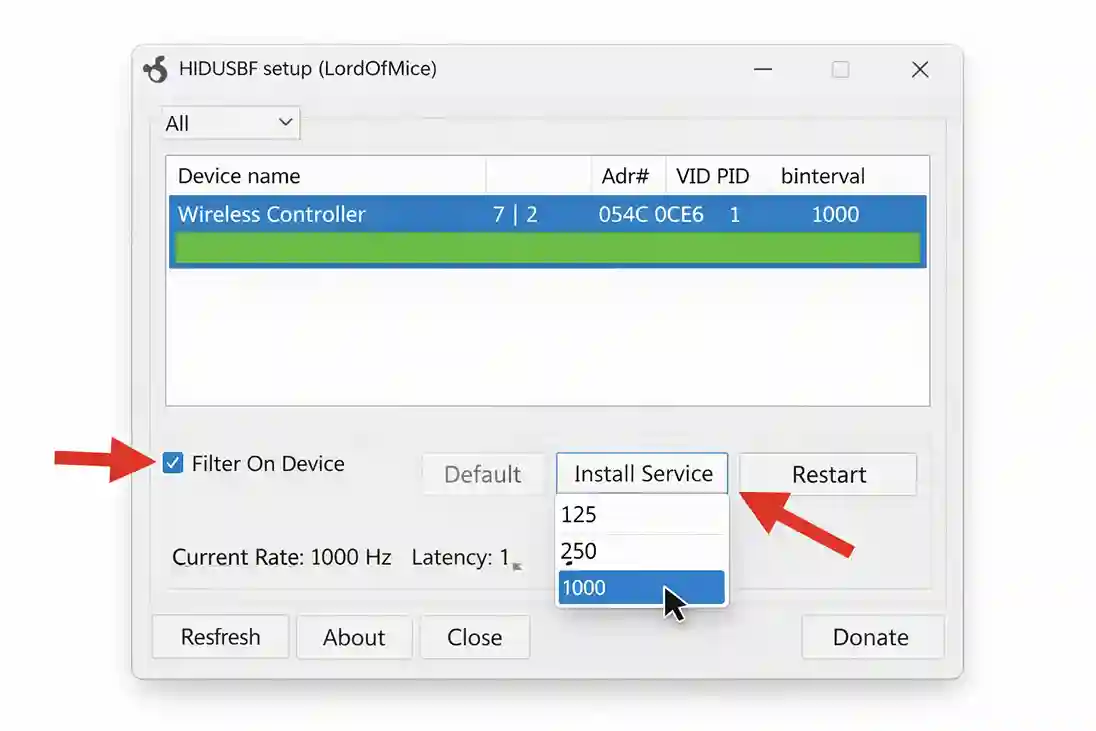
Ensure "Filter On Device" is checked and "Default" is set to 1000 before clicking Install Service.
4. Troubleshooting Common Errors
If it didn't work, don't panic. Here are the most common fixes.
Fixing the "Secure Boot" or "Core Isolation" Error (Windows 11)
If you are on Windows 11, the driver might fail to load. This happens because of a security setting called Memory Integrity.
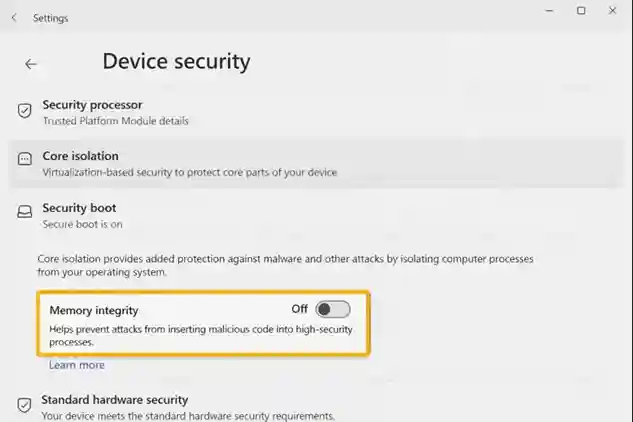
You must temporarily disable Memory Integrity for the overclock driver to load on Windows 11.
- Go to Windows Settings > Privacy & security.
- Click Windows Security > Device security.
- Look for Core isolation and click "Core isolation details."
- Toggle Memory integrity to OFF.
- Restart your PC.
My Controller Stopped Working (The Undo Button)
If your controller won't turn on after this:
- Open the
Setup.exetool again (use your mouse). - Uncheck Filter On Device.
- Click Install Service.
- Unplug and replug. It is now back to stock settings.
5. Is Xbox Overclocking Safe?
This is the number one question we get: "Will I get banned?"
Game Bans
No. You will not get banned. Anti-cheat systems like Ricochet (Call of Duty) or Vanguard (Valorant) look for aimbots and wallhacks. Overclocking a controller is just changing the polling rate. It is the same as buying a 1000Hz gaming mouse. Thousands of pro players do this daily.
Hardware Safety
It is very safe. You are not increasing voltage or heat. You are just asking the USB port to check for data more often. It might drain your laptop battery slightly faster, but it won't hurt the controller.
6. Verification: How to Test Your New Polling Rate
Don't just trust the feeling. Test the numbers.
- Download a tool called XInputTest or use Gamepadla.
- Run the program and spin your thumbsticks in circles.
- Look at the "Average Latency" number.
- Before: ~7.9ms
- After: ~0.9ms to 1.5ms
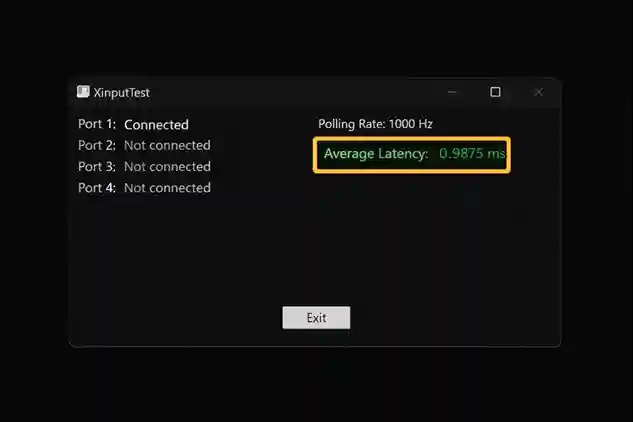
Successful overclock results in XInputTest showing approximately 1ms latency.
If you see numbers around 1ms, you have successfully completed Xbox overclocking: reducing input lag with hidusbf.
FAQ
Q: Does overclocking my Xbox controller work on console?
No. This guide only works for PC. Consoles like the Xbox Series X or PS5 have fixed USB polling rates. You cannot change them.
Q: Why does my polling rate still say 125Hz after installing?
You likely forgot to disable "Secure Boot" or "Driver Signature Enforcement." Windows is blocking the driver silently. Repeat Step 1 in the guide above.
Q: Can I overclock an Xbox controller via Bluetooth?
No. Bluetooth does not support the polling rate modification used by hidusbf. You must use a wired USB cable.
Q: What is the best polling rate: 1000Hz or 8000Hz?
For Xbox controllers, stick to 1000Hz. Most controllers cannot physically handle 8000Hz. Trying to force it can cause stuttering or disconnects.