Let’s be honest. There is nothing worse than losing a match because your controller decided to look at the sky on its own. Stick drift is a huge problem. If you are reading this, you probably tried blowing into the stick. Maybe you updated the controller. Nothing worked.
You might think you need to buy a new controller. You might think you need to learn how to solder. That is not true.
There is a third option. You can fix the drift by cleaning the sensor inside the joystick module. This guide covers the Xbox Series X drift fix using a solder-free potentiometer cleaning method. It requires patience, steady hands, and about $5 worth of tools.
What Causes Xbox Series X Drift?
To fix the problem, you need to know what is broken. Inside your controller, under the plastic thumbstick, sits a cube-shaped part. This is the joystick module.
On the side of this module, there are two small green (or sometimes orange) plastic parts. These are potentiometers. They track your movement.
- One tracks Up/Down.
- One tracks Left/Right.
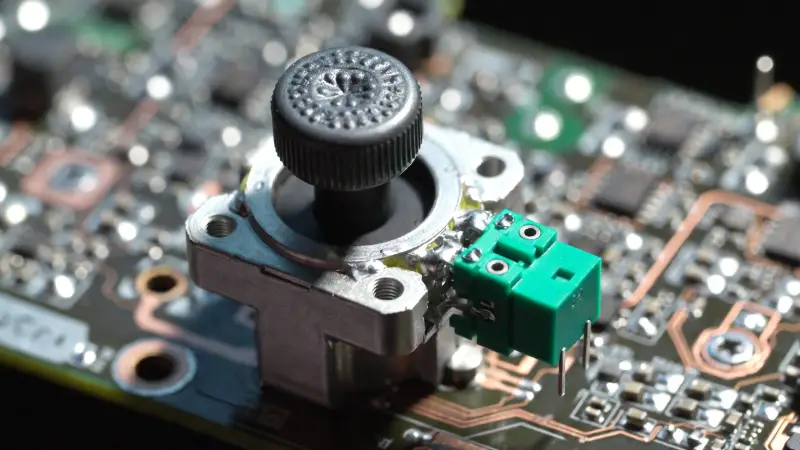
The Joystick Module: The green components on the side are the potentiometers that cause drift.
Inside these green parts, a small metal wiper rubs against a carbon track. Friction creates dust over time. When dust blocks the track, the sensor gets confused. It thinks you are pressing the stick when you are not.
Note: Before opening your device, check if you are still under warranty. You can check your warranty status on the official Microsoft Device Services page.
Tools Needed for Solder-Free Potentiometer Cleaning
You cannot do this with a standard kitchen screwdriver. You will strip the screws. Get these specific tools before you start:
- Torx T8 Security Screwdriver: This is mandatory. Xbox screws have a pin in the middle.
- Plastic Pry Tool: Use this to open the shell without scratching it.
- 99% Isopropyl Alcohol: Do not use water. Do not use 70% alcohol. Water damages electronics.
- Q-Tips (Cotton Swabs): You need these for cleaning.
- Tweezers: These help pick up small parts.
Phase 1: The Basic Xbox Series X Drift Fix (Try This First)
Before we open the sensor, let’s try the easy way. This works for minor drift.
- Remove the Batteries: Never work on a powered controller.
- Remove the Faceplate: Take off the screws. Lift the top shell.
- Pull Off the Thumbsticks: Pull them straight up. Now you can see the joystick module.
- Soak and Spin: Dip a Q-tip in your 99% alcohol. Drip a small amount into the joystick mechanism. Rotate the stick in circles for 30 seconds.
Let it dry for 5 minutes. Test it. If it still drifts, you need the deep clean.
Check Your Drift Percentage First
Before opening the module, quantify how bad the drift is. If it's under 5%, a Deadzone adjustment might be enough.
Launch Tester ToolPhase 2: Solder-Free Potentiometer Cleaning (The Deep Clean)
This is the real fix. This method solves drift where compressed air fails. We are going to gently pry open the potentiometer sensor to clean the inside.
Warning: Go slow. If you snap the metal legs of the sensor, the controller is broken.
Step 1: Access the Potentiometer for Cleaning
Once your controller is open, look at the joystick module. Find the two green plastic sensors on the side of the metal box.
- Is your drift Up/Down? Focus on the sensor on the side.
- Is your drift Left/Right? Focus on the sensor on the top (or bottom).
Step 2: The "Green Gate" Method
This is the most critical part of the solder-free potentiometer cleaning process.
- Look at the green plastic sensor. You will see three metal pins soldering it to the board. Do not touch these.
- Look at the top of the green plastic. You will see small plastic clips holding it against the metal box.
- Take a small flat-head screwdriver or thin pry tool.
- Very gently bend the green plastic housing away from the metal box. You only need to open it enough to see inside.
Tip: Think of it like opening a door just a crack. Do not bend it flat. The metal pins will snap.
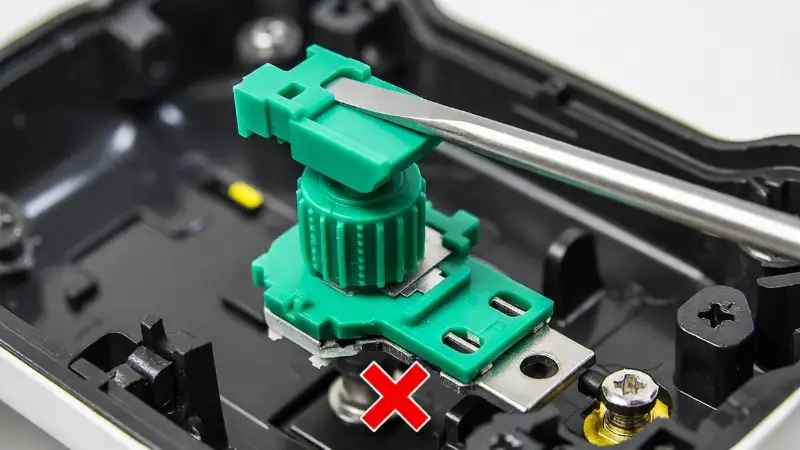
The "Green Gate" Method: Gently pry the top clip without stressing the soldered legs at the bottom.
Step 3: Clean the Carbon Track
The sensor is slightly open. You can see a black circular track inside. That is the carbon track.
- Soak a Q-tip in alcohol. Remove some cotton if it is too thick to fit.
- Rub the alcohol-soaked cotton gently against the black track inside the green housing.
- Check the Q-tip. Is it black or grey? That is the dirt causing your drift.
- Repeat this until the Q-tip comes out clean.
Step 4: The Wiper Disc Swap (Optional)
Sometimes, the metal wiper inside is bent. Cleaning won't fix a bent wiper. The wiper is a tiny metal disc inside the green housing.
You can buy replacement "Wiper Discs" online. They are cheap.
- Keep the green housing bent open.
- Use tweezers to pull the old metal disc out.
- Drop the new disc in.
- Snap the green housing closed.
This replaces the moving part without any soldering.
Reassembly and Calibration for Xbox Series X Drift Fix
Snap the green sensor back into place. Put the controller shell back together. You are not done yet.
When you move the sensor, the "center point" changes. You must tell the Xbox where the new center is.
- Turn on your Xbox.
- Go to Settings > Devices & Connections > Accessories.
- Select your controller. Click the beaker icon (Test Mode).
- Click Recalibrate. Follow the on-screen steps.
This software step is vital. It syncs your manual fix with the console. For a more detailed breakdown, check our Complete Guide to Controller Calibration.
Troubleshooting Your Solder-Free Potentiometer Cleaning
Problem: The stick feels loose after cleaning.
Fix: You may not have snapped the green housing clip back tightly. Squeeze it gently with pliers to lock it in. Be careful.
Problem: The drift got worse.
Fix: A piece of cotton from the Q-tip might be stuck inside. The wiper disc might have fallen out of position. Open it and check again.
| Method | Cost | Difficulty | Success Rate |
|---|---|---|---|
| Compressed Air | $5 | Very Low | Low (Temporary) |
| Contact Cleaner Spray | $8 | Low | Medium |
| Solder-Free Cleaning (This Guide) | $5 | Medium | High |
| Full Module Replacement (Soldering) | $15 | Very High | 100% |
Frequently Asked Questions
Can I perform an Xbox Series X drift fix with hand sanitizer?
No. Hand sanitizer contains water, gels, and scents. These leave a sticky residue. This will ruin the electronics. Only use 99% or 90% Isopropyl Alcohol.
Does opening the controller void my warranty?
In the USA, "Right to Repair" laws protect you. However, Microsoft may deny a claim if they see damage you caused. If your warranty is expired, you have nothing to lose.
How long does a solder-free potentiometer cleaning last?
It varies. If done well, it can extend your controller's life by 6 to 12 months. Eventually, the carbon track will wear down completely. The whole unit will need replacement then.