Your controller just died on you. You press the bumper, but nothing happens on the screen. Or maybe the button is physically stuck inside the plastic shell. It is frustrating, especially when you are in the middle of a match.
But don't go buy a new controller yet. Most bumper issues are simple mechanical failures. You can usually fix them at home for less than $10.
Here is the thing: You need to know exactly what is broken before you start taking things apart. This guide will help you figure out the problem and fix your Xbox Series X bumper quickly.
1. Xbox Series X Bumper Fix Diagnosis: The Sound Test
Before you grab a screwdriver, we need to know what we are dealing with. The "Sound Test" is the best way to do this. Put the controller up to your ear. Press the broken bumper. Listen closely.
- Scenario A: It Clicks, But Nothing Happens
If you hear the sharp "click" sound but the game doesn't register the input, your switch is likely dirty or wearing out.
The Fix: You need to clean the internal switch (See Phase 1). - Scenario B: It Feels "Mushy" or Loose (No Click)
If the button feels floppy, loose, or doesn't make that crisp clicking sound, the plastic internal arm is likely snapped. This is the most common issue with Series X controllers.
The Fix: You need to replace the plastic bumper assembly (See Phase 2). - Scenario C: It Is Physically Stuck Down
If the button is wedged inside the shell and won't pop back up, it might be sticky from soda or sweat.
The Fix: You need deep cleaning with alcohol (See Phase 1).
Wait, do you have drift too?
If your thumbsticks are also moving on their own, check our drift guide before buying tools.
Check Drift Fixes2. Tools You Need for an Xbox Series X Bumper Fix
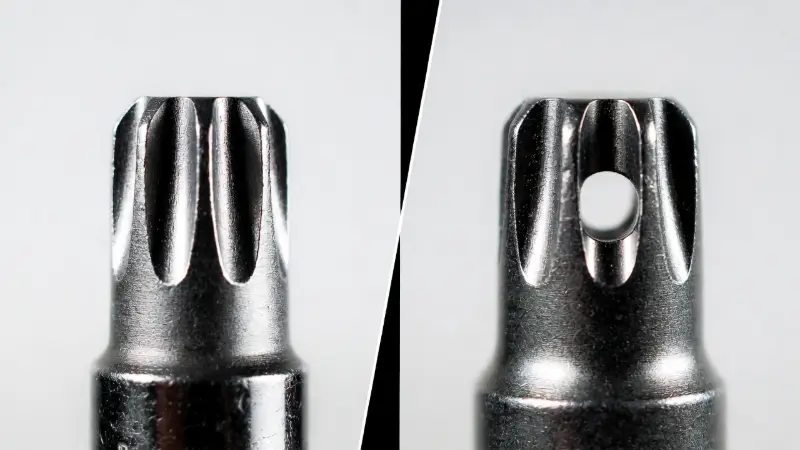
You cannot use a standard screwdriver from your kitchen drawer. Microsoft uses special security screws to keep people out. If you try to use a knife or a flathead, you will strip the screw and ruin the controller.
| Tool | Why You Need It |
|---|---|
| Torx T8 Security Screwdriver | Mandatory. It has a hole in the tip to fit the security pin. |
| Plastic Pry Tool | A guitar pick or old credit card works too. |
| Isopropyl Alcohol (90%+) | For cleaning dirty sensors. |
| Replacement Bumper (Model 1914) | Only if the plastic is broken. Ensure it says "Series X". |
3. Phase 1: Cleaning the Switch (No Parts Needed)
If your diagnosis was Scenario A (clicking but not working) or Scenario C (sticky), try this first.
- Remove the Batteries: Safety first. Take out the battery pack.
- Apply Alcohol: Dip a Q-tip in your Isopropyl Alcohol. You want it damp, not dripping wet.
- Rub the Edges: Rub the Q-tip firmly around the gaps of the LB or RB button.
- Work it In: Press the bumper repeatedly (20-30 times) while the alcohol is still wet. This helps the cleaner get inside the switch mechanism and dissolve any dirt.
- Dry and Test: Wait 5 minutes for it to dry, then test it in a game.
4. Phase 2: Replacing the Xbox Series X Bumper (Broken Plastic)
If your diagnosis was Scenario B (mushy/broken plastic), cleaning won't help. The plastic bridge inside the controller has snapped. You need to swap it out.
Step 1: Open the Controller Grips
The screws are hidden. Grip the plastic covers on the back handles (where your palms rest). Pull them away from the controller. They snap off. Do not be afraid to use a little force here, or use your plastic pry tool to pop them loose.
Step 2: Remove the Security Screws
Once the grips are off, you will see screws.
- There are two screws on each handle (4 total).
- There is one hidden screw inside the battery compartment, right behind the sticker. You have to puncture the sticker to get to it.
Use your T8 Security Torx to remove all 5 screws. Keep them in a bowl so you don't lose them.
Step 3: Remove the Faceplate
Flip the controller over. The front faceplate should now lift right off. Set it aside.
Step 4: Swap the Bumper Assembly
You will see that the LB and RB buttons are actually one single long piece of plastic connected by a thin bridge in the middle.
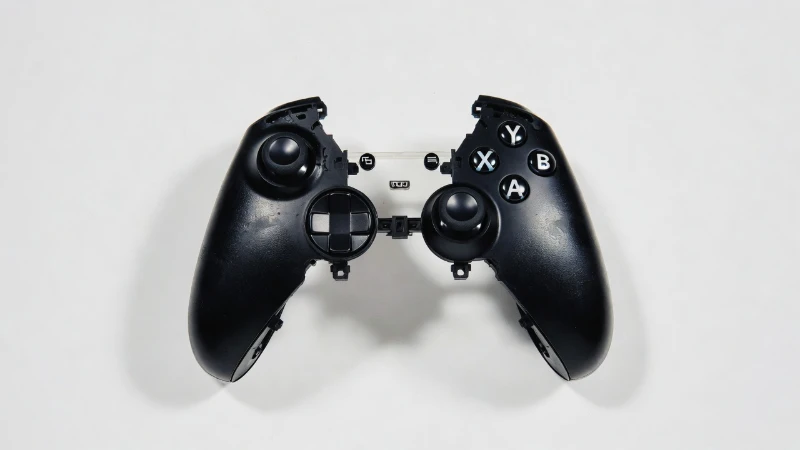
- Lift the old bumper piece out. It usually just sits on top of the triggers.
- Check the "Home" button area. Sometimes a small plastic ring sits there—don't lose it.
- Place your new bumper part in exactly the same spot. It should fit snugly.
Step 5: Reassemble
Put the faceplate back on. Screw in the 5 screws. Snap the grip covers back on. You are done.
5. The "Tape Trick" for Xbox Series X Bumper Fix
If you are waiting for parts to arrive but need to play right now, there is a temporary hack. If the plastic bumper is worn down but not fully snapped, it might be not pushing the internal button far enough.
- Open the controller (follow the steps above).
- Take a tiny square of electrical tape or duct tape.
- Stick it onto the small plastic peg on the bumper that hits the internal switch.
- This adds thickness. It helps the bumper reach the switch again.
It is not permanent, but it works in a pinch.
6. Frequently Asked Questions
Will opening my controller void the warranty?
Technically, breaking the seal behind the battery pack can void the warranty. If your controller is less than a year old, check Microsoft device support first. If it is out of warranty, you have nothing to lose.
Can I use an Xbox One bumper on a Series X controller?
No. They look similar, but the internal shape is different. You must get bumpers made for Model 1914 (Series X/S). Xbox One bumpers (Model 1708) will not fit.
Why do Xbox bumpers break so easily?
It is a design weakness. The LB and RB buttons are connected by a very thin piece of plastic. This plastic flexes every time you press a button. Eventually, that thin plastic gets tired and snaps.