Your Nintendo Switch is dead. You plug it in, wiggle the cable, and... nothing. No green light. No battery icon. You might want to fix it yourself. Other guides might make it look easy.
Here is the truth: A Switch charging port replacement is not a beginner repair. It is much harder than swapping a battery or a joystick. This guide explains why this repair is risky, lists the tools you actually need, and explains how the Switch charging port works to help you decide if you should try this fix or send it to a pro.
1. Why a Switch Charging Port Replacement is Difficult
Many people think replacing a Switch charging port is simple soldering. It is not. The USB-C port on a Switch is unique.
Standard soldering irons cannot do this job alone. Here is why:
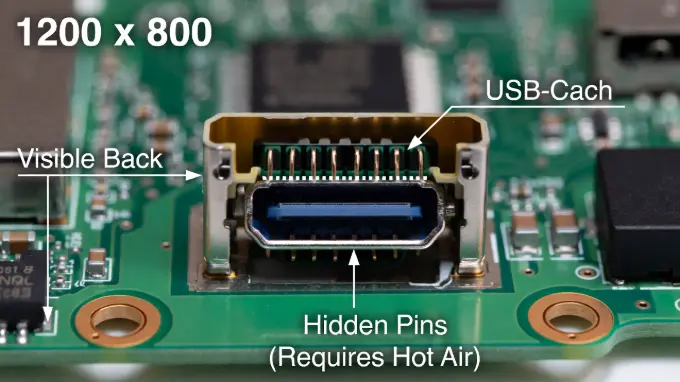
- Hidden Pins: As shown in the diagram above, the Switch charging port has two rows of pins. One row is visible at the back. The second row is hidden underneath the metal housing. You cannot reach these hidden pins with a soldering iron.
- Thick Board: The Switch motherboard absorbs heat very quickly. A cheap iron will get stuck to the board. It cannot stay hot enough.
- Tiny Parts: The components near the Switch charging port are smaller than a grain of rice. One slip can knock them off.
You need a hot air rework station. Without one, you cannot do a proper Switch charging port replacement.
Technical Warning:
If you do not own a hot air station, stop now. Attempting this with only an iron will damage the pads.
2. Diagnosis: Is it the Switch Charging Port or the Chip?
Check if the port is actually the problem. Sometimes, the issue is a power management chip inside the console. It might not be the physical port at all.
Use this table to check your symptoms:
| Symptom | Likely Problem | Solution |
|---|---|---|
| Visible bent pins inside the USB-C port | Switch Charging Port | Replace the port |
| Console charges but does not show on TV | Switch Charging Port (Data lines) | Check Docking Issues |
| Console takes 0.4 amps but screen is black | M92T36 Chip (Power IC) | Replace the M92T36 Chip |
| Console is totally dead, takes 0.0 amps | M92T36 Chip or Battery | Check chip first, then port |
| Wiggling the cable makes it charge briefly | Switch Charging Port | Replace the port immediately |
If your Switch charging port looks clean and straight, the issue might be the M92T36 chip. You need a multimeter to test this. See our guide on Testing Switch Power Chips for details.
3. Tools Needed for Switch Charging Port Success
You cannot use plumbing solder or a wood-burning iron here. To replace a Switch charging port safely, you need specific equipment.
- Hot Air Rework Station: Essential for melting solder on the hidden pins.
- Microscope or Magnifying Glass: You need to see the tiny pins clearly.
- Low-Melt Solder: This special solder melts at a lower temperature. It mixes with the factory solder. This makes removing the old Switch charging port easier.
- Flux: High-quality flux helps the solder flow where it needs to go.
- Wick: Copper braid to clean up old solder.
4. Step-by-Step Switch Charging Port Removal Guide
Do you have the right tools? Do you want to proceed? Here is the process for a Switch charging port replacement.
Step 1: Prep the Switch Charging Port Area
Take the motherboard out of the case. Remove the heat sink and thermal paste. Put high-temperature tape (Kapton tape) around the Switch charging port. This protects the small plastic connectors and chips nearby. If you skip this, you might melt the speaker connector next to the port.
Step 2: Remove the Old Switch Charging Port
Apply flux to the anchor legs of the port. Add your low-melt solder to these legs. Use your hot air station. Set it to about 350°C to 400°C (depending on your station). Move the nozzle in circles around the Switch charging port. Do not pull! Let the heat do the work. When the solder is shiny and liquid, gently lift the port away with tweezers.
Warning: If you pull too hard before the solder melts, you will rip the pads off the board. If that happens, the motherboard is likely ruined.
Step 3: Clean the Switch Charging Port Pads
Now you have a messy board with old solder. Apply fresh flux. Use your soldering iron and copper wick to gently wipe away the old solder. The pads where the new Switch charging port sits should be flat and shiny. Clean the area with Isopropyl Alcohol (IPA) so you can see clearly.
Step 4: Install the New Switch Charging Port
Apply a tiny amount of solder paste or fresh solder to the pads. Place the new Switch charging port in position. Use your hot air again. Watch closely. The molten solder will naturally pull the port into the perfect spot. This is called "self-alignment." Once it settles, nudge it very lightly. It should bounce back into place.
Step 5: Secure the Switch Charging Port Pins
The hidden pins are now connected thanks to the hot air. Now, take your fine-tip soldering iron. Touch up the visible pins at the back of the Switch charging port. This makes the connection strong. Clean everything again. Flux residue can cause corrosion later.
5. Risks of Failed Switch Charging Port Repairs
What happens if this goes wrong? A failed Switch charging port replacement can cause permanent damage.
- Bridged Pins: If two small pins touch, it can send 15 volts to the main processor. This kills the console instantly.
- No TV Output: If the hidden pins inside the Switch charging port do not connect, the Switch will charge but won't work on the TV.
- Burned Board: Too much heat can warp the motherboard. It can also pop other chips off the other side.
Are you unsure about your skills? Reliable repair shops charge between $80 and $120 for a Switch charging port fix. This is often cheaper than buying the tools yourself.
Frequently Asked Questions
Can I replace a Switch charging port with just a soldering iron?
No. The Switch charging port has hidden pins underneath the metal casing. A soldering iron cannot reach them to melt the solder. You must use hot air.
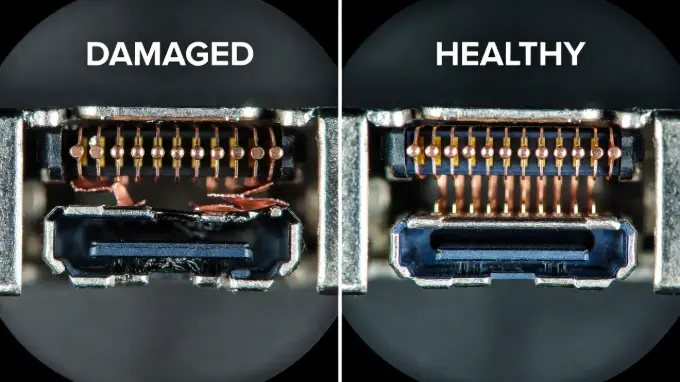
How do I know if my Switch charging port is broken?
Look inside the port. Is the plastic tongue broken? Are the pins bent? If so, you need a Switch charging port replacement. If it looks perfect, the issue might be a chip on the motherboard.
Will a Switch charging port repair fix TV docking issues?
Yes, if the repair is done correctly. The hidden pins inside the Switch charging port carry the video signal. If these are not soldered perfectly, the Switch will charge but will not display on the TV.
How much does a Switch charging port repair cost?
If you do it yourself, the port costs about $5. However, the tools can cost over $150. Professional repair shops usually charge around $100 for a Switch charging port service.