Have you spent hours gaming on your Steam Deck? If so, you might worry about stick drift. Stick drift happens when the internal parts of the joystick wear down. Here is the thing: standard joysticks use physical contact to work. This means they eventually break. A Steam Deck upgrade installing GuliKit Hall Effect joysticks fixes this permanently.
Why Choose a Steam Deck Upgrade with GuliKit Hall Effect Joysticks?
These joysticks use magnets instead of rubbing parts. Since nothing touches, nothing wears out.
- No More Drift: Magnets do not degrade like plastic sensors.
- Better Accuracy: These sticks often have smaller "deadzones." Your aim becomes sharper.
- Low Power Draw: They do not hurt your battery life.
Identify Your Model Before the Upgrade
This is the most important step. You must check your hardware before you buy parts for your Steam Deck upgrade installing GuliKit Hall Effect joysticks. Valve used two different joystick boards: Type A and Type B.
Go to: Settings > System > Steam Deck Controller ID
| Feature | Type A (MEDA) | Type B (MHDA) |
|---|---|---|
| ID String | Starts with "MEDA" | Starts with "MHDA" |
| GuliKit Version | Needs GuliKit SD01 | Needs GuliKit SD02 |
| Compatibility | LCD Model Only | LCD Model Only |

Critical Warning
Remove your SD card before opening the case. If you leave the SD card inside, the plastic shell will snap it in half when you pry it open. This is the #1 mistake people make.
Tools Required for the Install
To succeed, you need these specific tools:
- Phillips #0 screwdriver: For the main screws.
- Plastic prying tool: To pop the case open safely without scratching it.
- Tweezers: To handle tiny ribbon cables.
- Soldering iron: Required only if you want the touch-sensing thumbstick feature to work.
Step-by-Step: Steam Deck Upgrade Installing GuliKit Hall Effect Joysticks
1. Opening the Case
Unscrew the eight screws on the back cover. Keep in mind the outer screws and inner screws are different lengths—keep them organized. Use your plastic tool to gently pop the clips around the edges. Start near the triggers and work your way around slowly.
2. Swapping the Modules
Each joystick is held in place by three screws.
- Unplug the ribbon cable carefully. Lift the small locking flap first.
- Unscrew the old joystick module.
- Place the new GuliKit module in.
3. The Soldering Step (Optional)
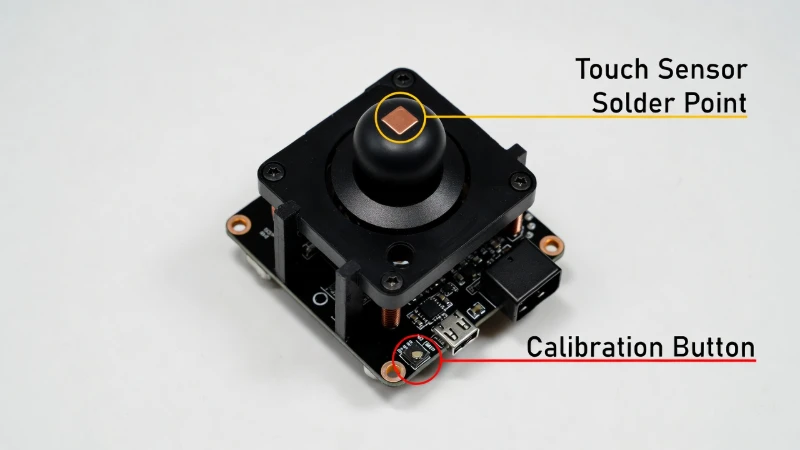
There is a red wire included in the kit. You must solder this to the top pad of the GuliKit module if you want the Deck to sense when your thumb touches the stick (Capacitive Touch). If you do not use this feature (mostly used for Gyro activation), you can skip soldering entirely.
Calibration (Hardware & Software)
Once you close the Deck, do not just start playing. The new sticks must be calibrated.
Hardware Calibration
On the back of the GuliKit module, there is a tiny button (see the image above). With the Deck turned on (but backplate off), press this button if your stick is not centered. This tells the GuliKit chip where "zero" is.
Software Calibration
Go to Settings > Controller > Calibration to verify everything is centered. If needed, you can also run the `thumbstick_cal` command in the Desktop Mode console.
Frequently Asked Questions (FAQ)
Does this Steam Deck upgrade void my warranty?
In the USA, opening your Deck does not automatically void the warranty. However, if you break a part (like a ribbon cable) during the install, Valve will not cover that specific damage.
Does this work on the Steam Deck OLED?
Most standard GuliKit kits are built for the LCD model. Always check the listing specifically for "OLED Compatibility" before buying, as the internal layouts are different.
What if my sticks are off-center after the upgrade?
Do not panic. Go into the Steam Deck desktop mode or use the calibration button on the back of the GuliKit module. This usually fixes the alignment immediately.